|
The iPhone 7 Plus screen is vulnerable, such as dropped, smashed, or otherwise chipped against surfaces, so much as you completely smash your screen, you're probably in need of a screen repair. When you crack your screen, maybe you will encounter some difficulties about detail, such as it also destroys your iPhone's water resistance. If your iPhone 7 Plus screen is broken, you want to replace the screen by yourself. This article will help you. Read More: Soldering Tools and Equipment on Mobile Phone Repair 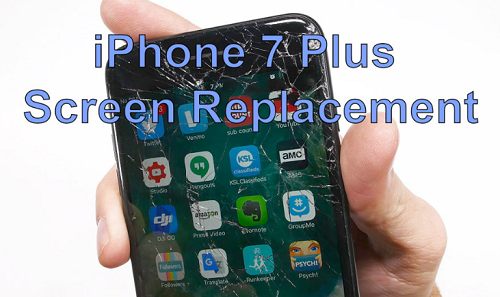 Repair Process: 1. Put off the iPhone 7 Plus. 2. Using a TS1 (0.8mm) screwdriver to remove the two screws, at the bottom of the phone locate. 3. Above the Home button, put a suction cup directly on the display and gently try to remove from the rear casing. 4. If necessary, use a wedging device to carefully break the seal of the adhesive and pry the display from the rear casing. 5. Open the iPhone 7 display and remove the four screws to free the display plate. Then use tweezers to lift the display plate away. 6. Use the spudger tool to pull of the three LCD connecting cable strips. 7. Unscrew two more tri-point screws at the top, right-hand corner that hold down your proximity sensor. 8. Remove the plate over the proximity sensor reveal one more cable strip that, when disconnected, will free the front display from the back of the phone. 9. Remove the three Phillips-head screws from the bracket behind the ear speaker at the top of the display side. 10. Pulling away The bracket to reveal the iPhone front rear camera. 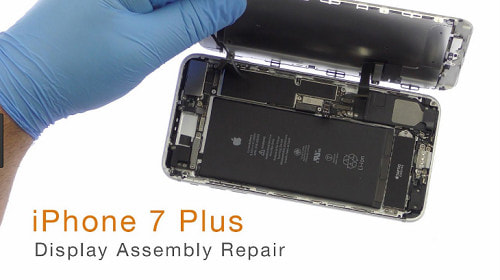 11. Pull back the camera to remove the two screws holding in the ear speaker assembly, and lift out the ear speaker. 12. Gently wiggle and pull up on the proximity sensor to remove it. Find the touch ID assembly, at the bottom of the display side. 13. Unscrew the four tri-point screws holding down the bracket, and remove bracket. 14. Gently wiggle to remove touch ID, then remove the LCD back-plate by unscrewing six, tri-point screws. 15. Using the spudger tool, lift up the LCD back-plate to reveal the cable strip connected to back-plate. 16. When you free the LCD back-plate of the cable, it will disconnect easily. 17. Discard your old, damaged LCD and replace with the new screen, folding down your cables and lining up the side mounts, to put the 6 screws back into place. 18. Continue to follow the steps in reverse to reassemble the phone. More information about phone repair guide and tools, you can choose Vip Fix Shop Team. 
0 评论
When the iPhone won't turn on, you tried to power on your device by pressing and holding the sleep/wake button and you see nothing but a black screen, it doesn't necessarily mean your phone is broken. Most of the time, the problem can be easily fixed if there was a software crash that caused the issue or your iPhone battery went down and drained completely. In this article, we are going to discuss the reasons why the iPhone won't turn on and we will give you the solution. Read More: The Best Christmas Gifts for iPhone User DIY Repair 1. Determine the iPhone won't turn on due to a hardware or software problem We need to determine is whether a software or hardware problem is preventing your iPhone from turning on. Your iPhone's software is the easiest to troubleshoot, so that's where we'll start. If that doesn't solve the problem, I'll discuss the hardware issues that can cause the problem.  2. Check the iPhone USB cable and charger Check iPhone USB cable and charger. Try charging your iPhone with another cable and another charger, or alternatively, try charging someone else's iPhone with your cable and your charger. If their iPhone charges and yours doesn't, don't skip to the next step just yet. 3. Charge the iPhone If the battery of your iPhone drained completely, your device will not turn on until you let it charge for a while. Many users often say they are sure the battery was not empty – even if you are sure, connect your iPhone to a wall charger and leave it for half and hour or more. Keep in mind that you should not try to turn your device back on right away – if the battery is completely empty, your iPhone will need some time to charge. 4. Force restart When iPhone turns off and won't turn back on again, the first thing you should try is a force restart. When a software crashes, the screen of the iPhone will be black, and it will look like the phone is off. Force restart is usually all you need to set things in motion again. Here is what you need to do: Press and hold the power button for at least 20 seconds Release the buttons when you see the Apple logo on the screen. If this doesn't work, toggle the Mute switch several times, and then go for a force restart again. If your iPhone won't turn on, move to the next solution.  5. Backup, update or restore the iPhone using iTunes
Before connecting your device to your computer, and launching iTunes, make sure that you have the latest version of the iTunes software installed. When iTunes is not up to date, various error messages may show up. Connect your iOS device to your computer, and launch iTunes. If the iTunes recognizes your iPhone, make sure to backup all your data first and then Restore. This will wipe the phone. If the screen is off but you hear sounds, notifications, vibration, etc, it means the display isn't working, in which case you should contact Apple or visit one of their stores. Recovery mode: If iTunes doesn't recognize your iPhone or iPad, you can put it in the recovery mode. Follow these steps: Connect your iPhone to your computer Launch iTunes Force restart your iPhone while it is connected to your computer. Press and hold the power button and the Home button at the same time. Once the Apple logo appears, keep holding the buttons. Release the buttons when the Recovery mode screen shows up. You will see two options: Restore or Update. Click Update. iTunes will install the latest version of iOS – this will not erase your data. 6. Dropped the iPhone or damaged of water damage If your iPhone is dropped or has water damaged, you have to disassembly and repair it use the precision screwdriver, LCD screen suction cup, and titanium alloy tweezers, etc. More information about phone repair guides and tools, you can ask help for Vip Fix Shop Team. Sometimes, the iPhone user may come across a situation where the iPhone gets stuck on the Apple screen. There are many reasons to cause this situation. Apple phone are sophisticated pieces of art and every new Apple phone will have a lot of new features. So, if you be careless to tamper or fiddle with its security systems do at times lead to such situations. If you have the iPhone stuck on iPhone Apple Logo, you can reference this article. 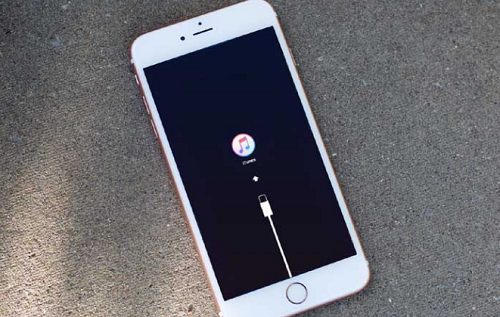 Read More: Replacement Steps: Repair iPhone 6 Lightning Port For DIY User The Reasons of iPhone getting stuck on the Apple Logo Screen: The iPhone had a problem during a system software update, this is the most common reason. Your iPhone is Jailbroken. Restoring the iPhone from iTunes and iCloud. After a regular update or restore. Something is wrong with the iPhone hardware. The Solution of iPhone Stuck on Apple Logo: 1. Hard Reset iPhone Pressing the iPhone power button and the Home button the same time, waiting for the home screen to go black. Once that happens, immediately let go the buttons. Press the power button again to restart the iPhone until the Apple logo appears, after which you can let go of the button. 2. Check Your USB Cable and USB Port You can also have a look at the USB Cable and USB port and be certain that there is no issue with it. 3. Restore Your iPhone Using DFU Mode Step 1: Open iTunes and connect your iPhone. Step 2: After this press and hold the Home and the Sleep/Wake button at the same time, releasing then after exactly 10 seconds. Step 3: After 10 seconds, release the power button but continue to hold and press Home Button until iTunes reminds"iTunes has detected an iPhone in recovery mode." Step 4: Release the Home Button. Your iPhone LCD screen will be black if you've entered DFU mode successfully. Step 5: Then Use iTunes to restore your iPhone. 4. Try to Update iPhone via Recovery Mode The next thing to try is to force an update to iOS via Recovery Mode, the benefit to this approach is that it attempts to reinstall iOS without modifying the data on the device. This approach will usually work if the problem with the iPhone is that an iOS system software update went awry, it will not resolve hardware problems or issues with a jailbreak. You will need a computer with the latest version of iTunes, and a Apple USB cable to complete a recovery mode update. Open iTunes on the computer and then connect the iPhone via USB. Place the iPhone into Recovery Mode by performing the following actions: Step 1: For iPhone 7 and newer models, press and hold the Power button and Volume Down buttons at the same time, continue holding them until an alert message comes up in iTunes saying an iPhone in recovery mode has been detected Step 2: For older iPhone models, press and hold the Power button and Home button concurrently, and continue holding them until an alert message in iTunes says an iPhone in recovery mode has been detected Step 3: At the iTunes screen, choose "Update" This will attempt to update iOS on the iPhone. If this fails you can try the process again and choose "Restore" but by doing so you will erase the iPhone and have the option of restoring it from a backup.  5. Repair Options
If you've taken all the suggestions above and the Apple logo is still stuck on your iPhone LCD screen, it's time to get it repaired. If you're under warranty, Apple should cover the repair if there's no other damage. Unfortunately, if you've taken my suggestions above and your iPhone still doesn't work, some form of liquid or physical damage is probably to blame. If you choose to repair your iPhone through Apple, they'll probably need to replace your it to solve this problem. Usually, the Apple logo gets stuck on the screen because of a problem with your iPhone's logic board, and that's not something Apple can swap out for a new part. If you're looking for a less-expensive option, Vip Fix Shop Team will provide the high quality tools and service. More information about phone repair tools and guides, you can try Vip Fix Shop Team. Your mobile phone has the boot problem, and you don’t know what to do. We trust our mobile phone and they need to work all the time. Everytime, the mobile phone problem will bring the serious impact for the work or life. In this article, Vip Fix Shop Team will explain what causes Huawei Mate 7 boot problem and how to solve it.  Read More: Wizards For Fastly Replace the iPhone WiFi Antenna Phenomenon Description: The mobile phone power on by programmable power supply, when we hold down the switch button, the current don't have change. Generally, for HuaWei Mate7 boot without current fault, the reason mostly is PMU output short circuit, but sometimes maybe VBAT(SYS) short to ground. Now this phone fault is not for the above reasons, but caused by BUCK_BOOST no voltage output. The Process of Analysis and Reapir: 1. Maintenance ideas The mobile phone boot without current fault ask to measure the voltage of each line, secondary system is it normally. You need pay attention to the RTC circuit abnormal is not caused the mobile phone boot without current fault. 2. Repair process a. Insert the charger into charging port to provide electricity, measure the L1501 voltage is 4.2V, so from this decision, the VBAT(SYS) is not short circuit and the voltage is normally. b. Measure the 6 routes VBUCK line of U1000 output has not voltage, it means the PMU output is abnormal. c. Measure the VOUT_PMUA(C1018), VOUT_PMUD(C1019) hasn't voltage, the diode value is normally. Then measure the VCOIN(C1013) hasn't voltage, the diode value is normally. d. All above is not the mobile phone fault reason, it means the fault is hidden deep. We back to the origin, check the exterior, then take off the U2002 foam and find it damages a little, finally find a breakthrough. 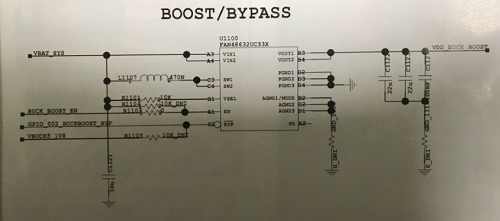 e. Measure the U1100 output voltage is 0V, but the OK board is in this state that does not press the power button on the power, the U1100 output(C1122) has 1V. The C1122 diode value is normal, so can't make sure to boot the the PMU or U1100 first. So ask help for Jass, it said that after normal power on, the BUCK-BOOST is boot first, after 5mins the LDO-PMUA will establish an internal quasi base source, simple speaking, after the U1100 normally output BUCK_BOOST voltage, the PMU will boot normally. 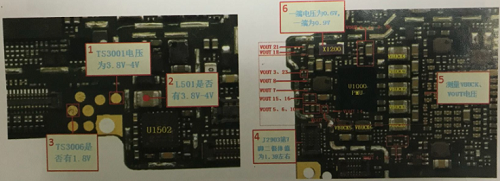 Solution:
Replace the U1100 and retest, the fault has been removed. Experience Summary: When we repair a fault phone, we can't disassembly or replace the parts or motherboard blindly. Every welding will shorten the life of motherboard, if you don't know how to repair next, you should ask help with your colleague. You accidentally wet your iPhone, dropped into water, in the bath, the toilet, in the basin and so on. You are very desperate and want to dry it out, fix the water damaged, and recover the data. The water damaged has many trouble result, and it is a sad fact. Apple statistical data showed that the first iPhone most common problem is iPhone LCD screen, but the second is certainly water damage. Many people can run into the water damaged. Now Vip Fix Shop Team will tell you how to fix the iPhone water damaged. The method to find the iPhone water damage. At the first, you can look for your water damage indicator. The water damage indicator is a little white tab which turns red when it is wet enough to damage your device. If this has turned red, it is likely that your phone has a problem. It is depending on your model, it will be in a different place: iPhone 4 and 4s, it is in the charging port. iPhone 5, 5C, iPhone 5S, & SE, it is in the sim card tray slot. iPhone 6, iPhone 6s, 6s Plus it is in the sim card tray slot. iPhone 7 and iphone 7s, it is in the sim card tray slot. 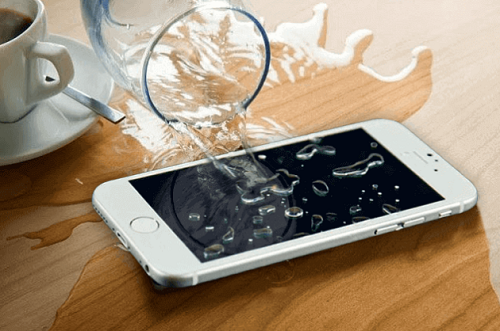 Read More: Best Solutions for iPhone 6 Plus Screen Flickering Problem 1. Power off If your iPhone would turn off after being damaged by water, don't panic or try to turn it on manually at this stage. If the water has reached inside the device, then it might cause more damage to your phone than good. To start with, keep it ideal and try not to turn it on. 2. Remove its SIM card After making sure that the phone is turned off, you need to ensure that the water won't damage the SIM card. The best solution is to take the SIM card out. Take the assistance of a paperclip or the authentic SIM card removal clip that must have come with your phone to take out the SIM tray. Additionally, don't insert the tray back as of now and leave the slot open. 3. Wipe its exterior Taking the assistance of tissue papers or a cotton cloth, wipe the exterior of the phone. If you are using a case to protect your phone, then get rid of it. Don't apply too much pressure while wiping the phone to minimize the iPhone water damage. Make gentle movements while keeping the phone stationary and moving your hands instead to clean its exterior. 4. Place it in a dry place Your next step to resolve the dropped iPhone in water problem should be to ensure that water won't damage its interiors. After clearing its exteriors, you need to be extremely careful of every step you take. It is recommended to place the device in a warm and dry place. This would evaporate the water content that is inside the phone. Mostly, people place it nearby a window that is exposed to the sun. Make sure that your phone is not directly exposed to too much sunlight. Instead, it should be placed in such a way that it would get constant (and bearable) heat. Placing it on the top of a TV or a monitor is also a widely used technique. While doing so, you need to make sure that your phone won't get damaged due to extreme exposure to sunlight. 5. Dry it with silica gel packets There are times when in order to resolve the iPhone water damage, users take extreme measures that backfire in the long run. One of the safest solutions to dry your phone is by using silica gel packets. While buying electronic items, users get extra packets of silica gel. You can also buy them readily from any major store. They absorb moisture in a superior manner simply by making minimum contact with the phone's body. Place a few silica gel packets over and under your phone. Let them absorb the water content that is inside the device. 6. Place it in uncooked rice You might have already heard of this foolproof solution to repair a dropped iPhone in water. Place your iPhone in a bowl or bag of rice in such a way that it would submerge in it. Make sure that it is uncooked rice else your phone might get unwanted dirt. Leave your phone in rice for at least a day to ensure that the water content would be absorbed entirely. Afterward, all you got to do is take your phone out and remove the pieces of rice from it. 7. Use a hair dryer This might be a little extreme, but even after following the above-mentioned drill, if the iPhone wet won't turn on, then you have to walk an extra mile. Be extremely cautious while using a hair dryer to fix the iPhone water damage. Keep the dryer in low power mode and gently blow it over your phone. You can keep your phone at a distance ensuring that the hot air blow won't cause any damage to it. If it will make your phone heat up, then switch off the dryer immediately.Best Solutions for iPhone 6 Plus Screen Flickering Problem  8. Dismantle it
Consider it as your last resort. If after following all the necessary measures to fix your device, the iPhone wet won't turn on, then you need to take the pieces out. Try to be extremely careful while doing so. Your aim should be to dismantle the phone, giving it some air, and drying its interiors. After drying the pieces for a few hours, you can assemble it back and try to turn it on. 9. Visit an Apple Store Chances are that after following these suggestions, you would be able to fix your phone. If it is not the case, then we recommend taking a safer approach. The best way forward would be visiting a nearby Apple Store or an iPhone repairing center. Go to an authorized store only and get your phone fixed. 10. Get a waterproof case After getting your phone fixed, make sure you won't suffer from the same problem again. One of the best ways is getting a waterproof case for your iPhone. You can either buy it online or from a retail store. Also, keep a Ziploc bag and an emergency kit with you. This will keep you prepared to resolve the iPhone water damage in no time. We hope that after following these suggestions, you would be able to solve your dropped iPhone in water issue. More information about phone repair guides and tools, you can choose Vip Fix Shop Team. When our iPhone has some bugs, we will choose update iOS, the software updates are generally designed to offer performance enhancements as well as bug fixes to a device. But when we update the iPhone iOS, not all of us can get the same posotive result. Many iPhone 6 owners are complained that the iPhone 6 cannot connect the WiFi after updating iOS. In view of this problem, Vip Fix Shop Team will give you a solution to solve it. Hoping you can benefit from it. 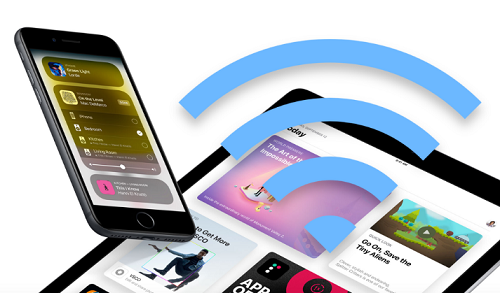 Read More: The Professional High Quality Mobile Phone Reapir Tool The Reason of cannot connect the WiFi on iPhone 6. What causes Wi-Fi problems on iPhone? There are many reasons to cause the iPhone 6 cannot the WiFi after installing software updates. The simple reason, such as enabled Airplane mode, or the fact your iPhone is too far from the router. The signal can be poor at times, which is why your connection can be slow. A software bug can also be one of the reasons, as well as the issues with network devices (modem and router), or the iPhone’s antenna. Some short ways to solve the WiFi problem. 1. Turn Off the Wi-Fi Button And Back On. If your iPhone won't connect to a Wi-Fi network or if it does connect but the connection drops, start with some simple things before you confirm that the iPhone WiFi chip is not damaged. If you haven't tried it already – turn Wi-Fi off and back on. You can swipe from the bottom edge of the screen and open the control center. Tap on the Wi-Fi icon to turn it off. Wait for a couple of seconds and tap the icon again to turn the Wi-Fi back on. Another way to turn Wi-Fi off/on is through iPhone settings. Go to Settings > Wi-Fi, and toggle the switch next to Wi-Fi. 2. Turn Off The Bluetooth. Bluetooth can be of the reasons why your iPhone won't stay connected to wifi network or won't connect at all because the Bluetooth can cause interference with Wi-Fi connections. That is why you should turn it off to see if that will make any difference. You can either swipe up from the bottom edge of the screen and tap on the Bluetooth icon, or you can go to Settings > General, and turn it off. 3. Toggle Airplane Mode. When we discussed some of the reasons why your iPhone or iPad won't connect to Wi-Fi, we mentioned the Airplane mode. If it is turned on, that's why the device won't connect to the network. As soon as you turn it off, the problem will be solved. Toggling the Airplane mode can be pretty effective and it can help you fix the problem. Go to Settings and turn the Airplane mode on. Wait for 30 seconds and turn it back off. Try to connect to a Wi-Fi network again. 4. Reboot your iPhone. A restart can be a very effective solution if your iPhone cannot connect to a wifi network. To restart, press and hold the Sleep/Wake (Power) button until you see the red slider. Next, drag the slider to power off your device completely. After a few seconds, press and hold the iPhone Sleep/Wake button again until the Apple logo appears. This process won't affect any data stored on your device, thus it's safe. Alternatively, you can force your iPhone to restart instead. To force restart your device, hold down the Sleep/Wake (Power) and the Home buttons simultaneously for about 10 seconds until the Apple logo shows up on screen. 5. Forget Wi-Fi Network and Reconnect. It is also possible that the update overrides or nullifies existing network settings and the reason why you can no longer connect to your Wi-Fi network with the current settings. In this case, forgetting Wi-Fi network may likely be the best option.  6. Disable Location services for Wi-Fi Networking.
Turning this feature off will not disable Wi-Fi completely. Only those location services that are being used for wireless networking will be disabled. Other users said they've managed to fix the problem and get connected to their Wi-Fi network again after disabling Wi-Fi networking services on their iPhones. So you might as well want to give it a try and see how it does on your end. Here's how: Go to your iPhone Settings. Tap Privacy. Tap on Location Services. Select System Services. Toggle the switch next to Wi-Fi Networking to turn the feature OFF. Try to connect to your Wi-Fi network with Wi-Fi network services turned off. 7. Update Router Firmware. If your iPhone won't connect to Wi-Fi home network, maybe updating the router firmware will fix the problem. The first thing you need to do is find the model and version number of your router. You can find these info on the box of the device or in the manual. Also, the model and version number are usually located on the router itself, on its backside or underside. Go to the manufacturer's official website, and look for the Download section. Find your router, and download and install the firmware. If you are not sure how to do this, you will find the guide on the manufacturer's website. 8. Set Custom DNS. Try altering the current DNS server settings on your iPhone. If you are willing to try it now, take note of your current DNS settings before you start making changes. That way, you can always revert it back to the original settings should the alteration won't do any good at all. To those who don't know how, here's how to change the DNS settings on your iPhone: Go to Settings. Tap on the Wi-Fi menu. Locate your Wi-Fi network from the list of available networks and then tap the information (i) icon next to it. Scroll down to the DNS section. Tap on the numbers next to DNS to change them. From the keyboard, enter the new DNS server address. More information about phone repair tools and guides, you can choose Vip Fix Shop Team. This article will tell you the real solution for iPhone 6 no sound and not boot. Tell you what could have possibly caused your iPhone to lose sound and can't boot. If you are trouble of your iPhone 6 no sound and can't boot, you can follow these article to recover. Vip Fix Shop Team hope you can benefit from it.  Read More: The Professional High Quality Mobile Phone Reapir Tool Connect it to DC power supply and boot, we found the current jumps normally, but the iPhone screen not display. After we connect it to computer, it prompts "please click on the device to trust". Picture 1-1 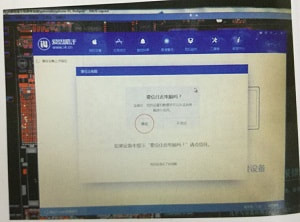 Now we can judge that the iPhone 6 can boot, just the iPhone screen no display. Disassemble the iPhone and measure the resistance of the display socket; the diode data of the screen reset and open signal are all abnormal. Observe it under the microscope, we found the trace of the hitting on screws which on both sides of the left and right. Remove the iPhone screws, scrape it, and then solder the jump wire on it with soldering station, now the iPhone can display normally. Because diode data of fingerprint socket which on the right screws are normal, so we didn't scrape it. Picture 1-2 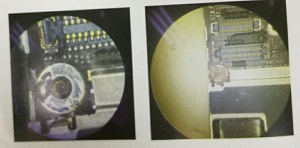 After testing, it can record, playing a sound, the earpiece has no sound. Use multimeter to measure the diode data of iPhone front camera socket earpiece pin, the data is normal. The earpiece pin is through the inductor directly to the audio IC. Remove the iPhone audio IC, and then measure the diode data of I2S bus which is through to CPU, we found both the CODEC_TO_AP_XSP_I2S2_DIN and AP_TO_CODEC_ASP_I2SO_DOUT are infinitely large, it is open circuit. Picture 1-3  Find an iPhone motherboard to scrape it to check the line layout, scrape and ended up on the third floor of the right screw column. Picture 1-4 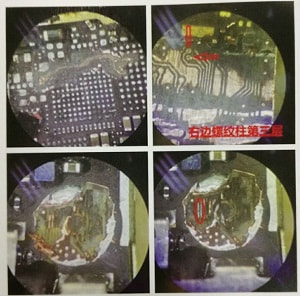 Mend the wire and put it back into the chip. Assemble iPhone and test it, earpiece back to normal, the repairs end!
Some people have been complaining that the iPhone 6 / 6 Plus touch reaction is slow, or it is don't work directly, we call it "touch disease". The iPhone 6 and 6 Plus are flimsy, and their internal components can be injure, like flexing. Maybe you use it with normal use, you can't deform the outer case of your iPhone, internal components can still be damaged. Let's take a look at what is the "touch disease" and how to fix it.  Read More: The Common Problems And Resolvent on iPhone The iPhone 6 Plus that has been sent, customer description says, it suddenly no touch during the normal use and this iPhone hasn't been repaired before. So we know the reason, then we start to fix. 1. We first thought it is caused by iPhone black touch IC M1 pin disconnection. Remove the black touch IC, we found that there were no signs of M1 pin was empty solder or disconnection. Anyway, now the chip has been removed, so we measure the diode data of it with multimeter. Measuring the diode data of several important pins which on black IC solder pad, all is normal. Picture 1-1 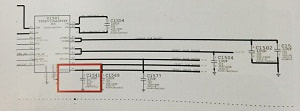 2. Then we scrap the M1 pin, and solder a jump wire on it with phone soldering station, now we put back the black touch IC, power on it, and test it, the failure still exists. Now we can rule out this reason. Measuring the working conditions of white touch IC, we found the diode data of white touch IC 5.1V power supply Filter Capacitor only about 70,so we suspect this could be caused by a short circuit inside the touch IC. 3. Remove the touch IC and measure the diode data of 5.1V, it still only about 70, we didn't find the real problem yet. 5.1V in addition to the touch IC and display power IC peripheral circuit, only two of the filter capacitor, so we just pry the two capacitors out. After pry out the capacitors, measure it again, the diode data recovered to over 500, looks like the capacitor is short circuit. We can check it under the microscope, as shown in picture 1-2 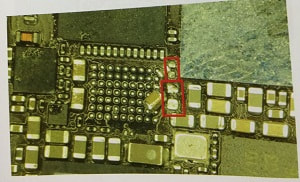 4. Find an iPhone junk motherboard, and then fill back the capacitor. Assemble the touch IC, supply power on it, then test it, now it can be touch, the problem is solved.
If your iPhone 6s has a black screen or cannot be turn on. It must be affecting your work and life, you may think that you are going to need buying a new one. When the problem is bad enough, that could be true if. Now Vip Fix Shop Team will give you the solution of iPhone cannot turn on after droppen. In the absence of software problems, you can try these methods.  Read More: FIXED: iPhone Blue Screen and Restarting Issue An iPhone 6S dropped and then it doesn't boot. Disassemble the iPhone with phone opening tools, and then put it connects to DC power supply, it shows big short circuit. After measure it, we found the PP_VCC_MAIN is short circuit. Many of dropped iPhones PP_VCC_MAIN filter capacitor will be short circuit. Picture 1-1 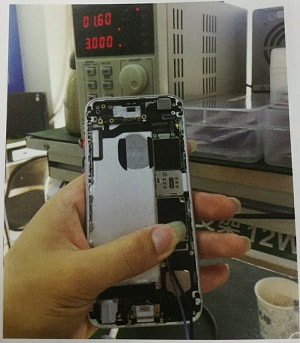 Remove the iPhone motherboard, and observe it under the microscope, we found the capacitance C5283_RF next to iPhone WI-FI chip turned gray, it differs greatly from the color of the capacitor next to it. This capacitance is the filter capacitor of PP_VCC_MAIN. Picture 1-2  Now we directly remove this capacitor, and measure it again with multimeter, the resistance value is back to normal. As shown in picture 1-3 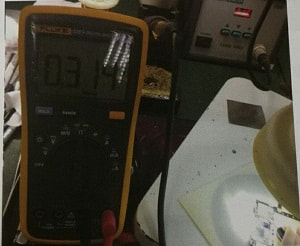 Connect it to DC power supply again, and boot it, now it shows normal, the iPhone 6s can be turned on. The repairs end! Picture 1-4  |
vipfixphone
|
 RSS Feed
