|
Has your iPhone 6 screen gone grey and unable to use it ? Or the phone battery has a bit of a problem. Maybe you think that you have to take the iPhone back to your nearest Apple store to repair or replacement but that may not be the case. Depending on what caused the screen to go grey, one of these solutions may help you out. Now Vip Fix Shop Team can help you. Trouble Phenomenon: The iPhone 6 Plus battery percent inaccurate, and often reboot. Repair process: When we test the charging function, it shows normal, but the battery power percentage jump frequently. Base on repair experience, this phenomenon should be a reboot frequently caused by battery failure, so we should repair the battery power percentage inaccurate first. So we connect iPhone to i4 tool, the position of battery information shows no data, this failure is the CPU doesn't recognize the battery, so i4 tool can't read the battery data. As shown in picture 1-1.  The main reasons for not recognizing battery information as follows: 1. The battery is damaged 2. The circuit from middle pin BATTERY-SWI of battery interface J2523 to F2 of charging chip U1401 is broken and the U1401 was damaged 3. The problem of circuit from U1401 G1 # to CPU AG4 # and problem with the CPU itself. The schematic diagram is shown in picture 1-2 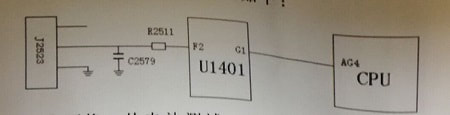 Then we replace the new battery and test it, i4 tool still can't read the battery information. Then measure the diode data of battery middle pin with Multimeter, the diode data is 380 which is normal, so the line from battery to U1401 is normal. Next we remove the U1401 IC, and then measure the line from G1 pin to SWI of CPU, the diode data of G1 is 450, its normal. Now, we can judge U1401 or CPU is damaged. 1-3 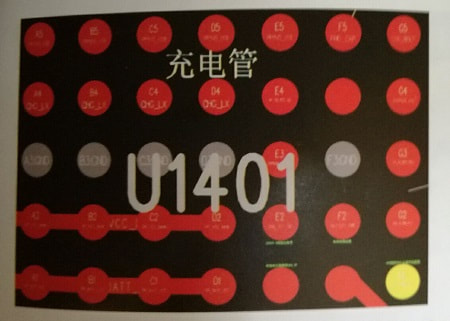 After replace the U1401, it still can't read the battery. This fault is not caused by the CPU welding, but because the CPU damage pulls down the voltage of the SWI line, so we can increase the SWI voltage by connecting the resistor externally. Connect a 2.2K resistor on PP3V0_TRISTAT, the other end of the resistor is attached to U1401 G1 pin (also can connect to middle pin of battery). The picture of solder jump wire is shown in 1-4.  After soldering jump wire, the picture is shown in 1-5 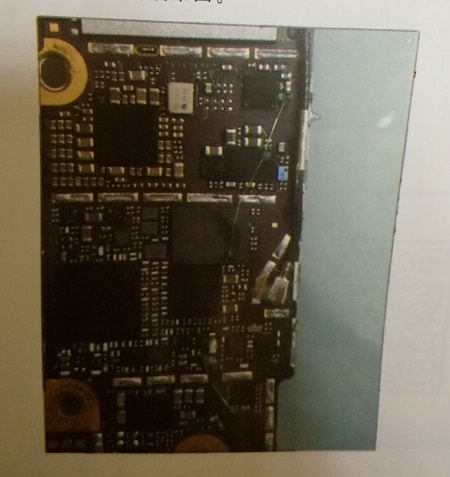 Finally, turn on iPhone 6 Plus and connect to i4 tool, now it can read the battery information, the fault has been repaired. As shown in picture 1-6. 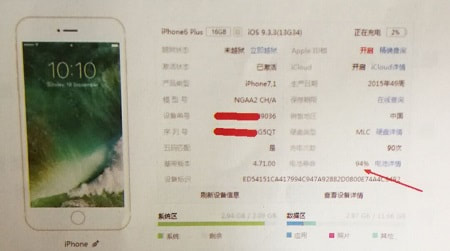 Tips: you can use 3U tool to replace the i4 tool.
0 评论
Back in 2016 an Apple scandal hit the headlines: Touch Disease.  What is Touch Disease?
Which phones are affected by Touch Disease?
What causes Touch Disease - and how can I avoid it?
What to do if you're affected by Touch Disease?
Generally, power issues would start to emerge on a device after several months or years of usage. But this is not always the case. As a matter of fact, a number of #Apple #iPhone6 owners have been raising complaints online regarding their iPhones that won’t boot up for some reason, even after just a few days or weeks of use. (1-1)  Repair Process: 1. After openning device, we find BS2503 screw has already been disassembled. Blow off, the BS2502 screw has traces of being damaged. (1-2~3) 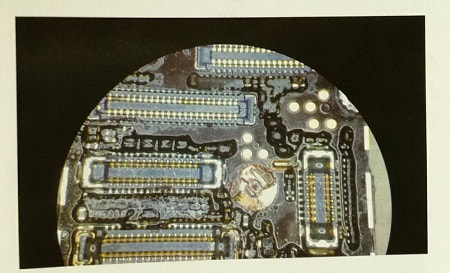 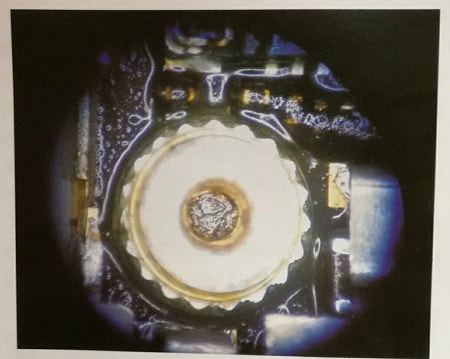 2. We find 14 base AP_TO_LCM_RESET_CONN_L shows infinite number when measuring the reststance of J2019 base. (1-4) 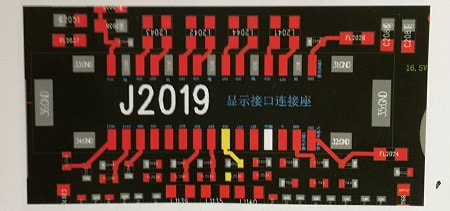 3. CPU reset signal on the screen is to go under the BS2502 screw column, scraping the screw column to measure, we find it's broken on the edge, which and can only be solved by jumper wire. (1-5) 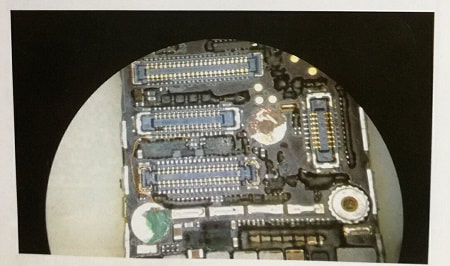 4. After soldering the jumper wire and install screen to test, we can see backlight but no display, the measurement shows no voltage on the both positive and negative 5.7V of the display. Here we move into the measurement when it is power off , the C1554 capacitor 1 base shows infinity, this foot is leading to the U1501 display chip C4 base. (1-6) 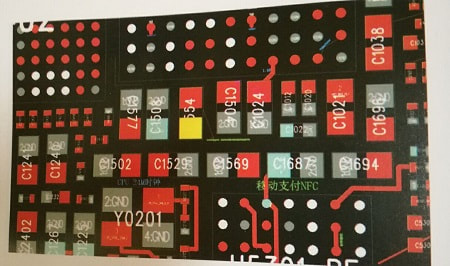 5. Then we disassemble display chip U1501, the C4 base solder pad was broken, so we solder the jumper wire and install chip on it. (1-7) 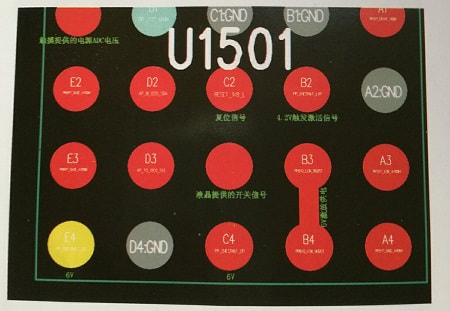 6. Install the iPhone device and turn on it, it can display normally, finally we succeed in solving the fault on iPhone 6.
If your iphone 5/5s won't turn on after charging and cannot be turned on. Maybe you think that you need a new one, but before you make the decision you can try these ways. It can save your money and time.  If your phone has some problems about restart or reboot, you need some tips to solve it. Now vipfix can provide you some tips to save your iPhone. Hoping you can benifit from it.  There have been some complaints such as “My iPhone 5s keeps restarting while charging”. Same as all the other issues, this one may occur on every iOS device. To avoid this problem, make sure you are using the original cable and charger that came with your device. Usually, the issue occurs if the user is not using the original charging accessory.
1. Change current charging method. If you have been charging your iPhone or iPad using a wall charger, connect it to your computer and vice versa. 2. Toggle Cellular data. Go to Settings > Cellular, and turn Cellular data on/off. 3. Press and hold the sleep/wake button and the Home button at the same time for at least 10 seconds. Keep holding the buttons until you see the Apple logo on the screen. 4. Make sure the charger and the cable are not damaged. 5. Clean the charging port with a toothpick to remove any dust, dirt or debris. 6. Update iOS. Connect to a Wi-Fi network. Go to Settings > General > Software 7. Update and tap Download and install. 8. Restore your iPhone or iPad to factory settings using iTunes. Connect your iOS device to your computer. Select your iPhone or iPad once it appears in iTunes. In the Summary panel select the option “Restore”. Click Restore to confirm your action. If your iPhone keeps shutting down we recommend you to contact repairman or the nearest Apple Authorized Service Provider. If you want to DIY, you need prepare some phone repair tools at vipfixphone.com. Some users report variations of a “Network Connection Timed Out” error when trying to update their iPhone update to a newer version of iOS or even when attempting to connect to the iTunes Store. It displays error code (56). A customer said that iPhone 6 Plus has been dropped and the screen has been changed. After being used for few days, it failed to auto-update. ITunes reports unknown error (56) when rooted. Now vipfix will help you. Repair Process: 1. First root it to make sure whether it reports error (56). After rooting and testing, it does report error (56). 2. In most of the cases, faulty camera circuits and NFC circuits will cause such a problem. Tearing it down and check the motherboard, the motherboard has been fixed. The previous maintenance have fixed NFC major control chip U5301_RF, its location is shown as picture 1-1. Other chips are not fixed by observing its appearance. 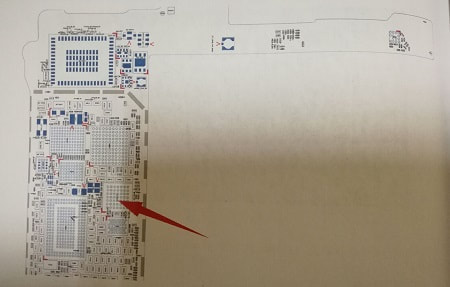 3. In real repair cases, MIPI bus could cause error (56) report. First measure the diode data to ground of the MIPI bus of the front and rear camera by multimeter. These data are normal. 4. Customer said that he could use the iPhone normally before updating it, so the camera circuits have no problem. The major problem must happen at NFC circuit. Most people have not used this function, so they do not know whether it is normal or not. 5. NFC has two chips. One is major control chip (U5301_RF); the other is minor control chip (U5302_RF). In general, I first exclude the major control chip problems and then the minor control chip problems. 6. In rear repair cases, the dropped iPhone CPU and NFC signal circuits are easy to be disconnected. The NFC solder pad is easy to drop joints. So remove NFC major control chip U5301_RF. The solder pad does not drop any joints. Then measure the its diode data to ground to CPU data cable by multimeter and measure the resistance of U5301_RF. These data are normal. Now, I doubt that NFC major control chip U5301_RF is damaged. Replace the old one, but the problem remains the same. The diode data to ground of several data cables from NFC to CPU are normal, so CPU pseudo soldering problem can be excluded. 7. Next removing NFC minor control chip U5302_RF, I find some problems. The location of U5302_RF is shown in circuit diagram picture 1-2. 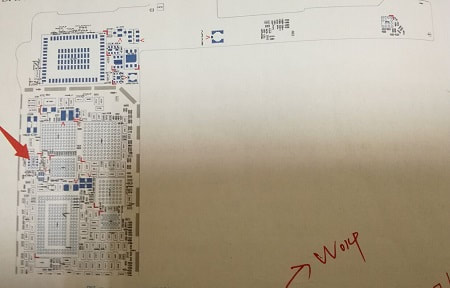 8. The solder pad of NFC minor control chip U5302_RF drops 3 joints, as shown in picture 1-3. One of the pins is power supply(VC471) pin and other one is ground pin. Jump wires to connect these pins and assemble NFC minor control chip U5302_RF. Rooting goes on smoothly. Trouble is removed.  |
vipfixphone
|
 RSS Feed
