|
When your iPhone has error code 4014, you must consider to sent to repair store to fix. Put simply, the error is hardware related, if you don't really get to fix by yourself, it is the most troubling issue. Vip Fix Shop Team has a variety of solutions that worked. What we try here is to make sure you don't go about trying them randomly, because it will make easier to fix.  Read More: Introduce the Best Battery-Activation Tool for You 1. The 6 iPhone Plus can be normally used before, there were no any problems. But after changing the iPhone Nand for memory capacity expansion, it reports error 4014 when flashing it. As shown in picture 1-1. 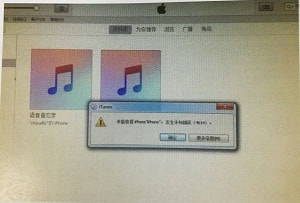 2. When we flash the iPhone device, it displays error 4014 before progress bar showing up. It is restored and the serial number could be recognized, which appeares after Nand expansion. This is usually caused by the iPhone USB chips leading to CPU problem. We get to know it UMT motherboard after disassembly, then remove USB chip U1700 to measure resistance from solder pad to CPU, we find that AP_TO_TRISTAR_ACC_UART6_TXD shows the infinite value, as shown in picture 1-2 and 1-3. And AP_BI_12C0_SDA is also broken, as shown in picture 1-4 and 1-5. 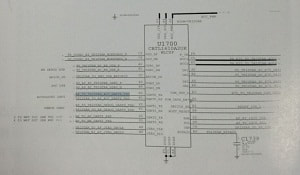 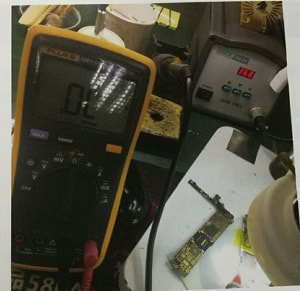 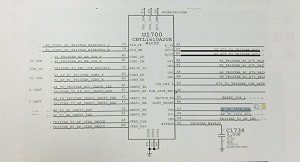 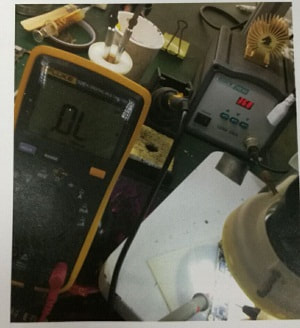 3. The layer wire is disconnected, so we need to find out other connection point or digging for other holes, AP_TO_TRISTAR_ACC_UART6_TXD is direct connected without other external components, when digging the circuit AP_TO_TRISTAR_ACC_UART6_TXD we find that there is a hole next to socket, dig it to solder jumper wire. As shown in picture 1-6, 1-7 and 1-8. 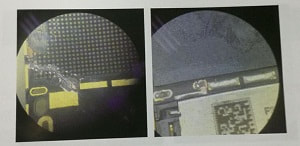 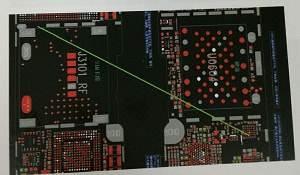 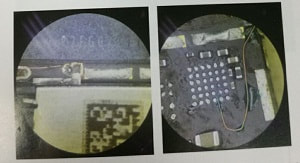 4. AP_BI_12C0_SDA has a test point outside of the iPhone circuit board, welding directly from the test point. As shown in picture 1-9 and 1-10. 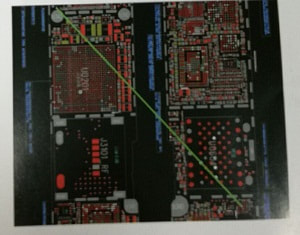 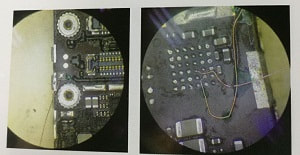 5. Intall the iPhone USB chip back, we can flash the iPhone device normally now, repair ends here!
0 评论
The phones play an important role in our life, we are getting more and more inseparable from our phone, but after a period of using the mobile phone, there will be more or less problems. How to solve these problems is the next things that we need do. When you use the iPhone, the screen, battery, motherboard, glass back, usb charger, etc, will has some problems. Now Vip Fix Shop Team will give you some methods to solve it. Good luck for you.  Read More: What To Do When the iPhone Home Button is Broken After disassemble and test, we find the iPhone 7 plus is severely corroded by water. So in this case, we should observe the corrosion under a microscope first, and then the corresponding phone schematic diagram to understand the role of corroded components in iPhone. Rip off the motherboard sticker that can be ripped, and remove the iPhone PCB shield cover that can be removed. According observe, we find the most serious is the display backlight part. Now we can clean the iPhone motherboard first, and then measuring power supply C3405 with multimeter, it directly to the ground, careful observation under the microscope found that C3722 was severely corroded. After removal, the diode data of the main power supply becomes 298. At this time, connect it to power and phone standby leakage 30mA, press the iPhone power button, the iPhone screen is lit, but the left screen is dark. Leave it alone, enter the IOS, and insert the SIM card to test, we find there is no 3G、4G, the fingerprint is normal. It not only stuck on fingerprint setting, but also the restore network, restore all settings. Observing it under the microscope, we found that FL3901 corrosion seriously caused the left iPhone backlight IC cannot supply power. After soldering jump wire, it's back to normal. Picture 1-1  Then found R7109 corrosion damage caused the power supply to high-frequency power amplifier circuit impassability, resulting in no 3G and 4G. After soldering jump wire, it's back to normal. Picture 1-2  Now we're going to solve the problem that stuck on iPhone. We want to backup first and then brush iPhone, then we found it can connect to PC, but when you connect to iTunes, it times out, dis U2 cause it? So we replace it with iPhone 6S U2 IC, but the problem still exists. So now we directly use DFU mode to forced brush iPhone. However, when the progress bar shows 60%, it reports unknown error 56, re-flash several times, it still the same, the unknown error 56 most caused by NFC. iPhone Baseband CPU、camera power supply could also cause the problem, but these function all is normal, so we judged NFC. Observing NFC under the microscope, we found that it had a little corrosion. Picture 1-3  Remove the NFC, and measure the diode data of NFC, we found the G2, D5 and C7 all is connect to ground. From the phone circuit diagram, these three points are connected to the NFBST_RF, as shown in picture 1-4, we directly remove it, G2 still short circuit. After remove the C7517, the resistance is normal; D5 and C7 also back to normal. Replace the chips on motherboard, and weld well, flash it again, it still reports unknown error 56. Water-damaged motherboard power supply is the easiest to burn, so we remove shield cover of iPhone CPU. 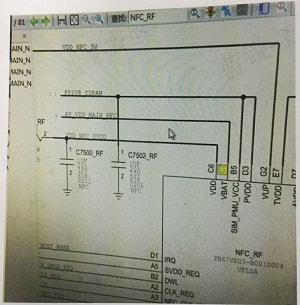 It can be seen from the schematic diagram, there is a group of power supply PP_VDD_MAIN_NFC converted by NFCSW_RF which from main power supply, so we can weld the jump wire from the A1 pin to the A2 pin. Picture 1-5 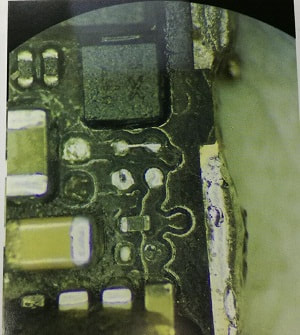 Brush the iPhone again, now it can be successfully brushed iPhone. Enter the IOS system and test all functions, now it is not stuck on iPhone fingerprint setting, seems it was caused by system issues. Now, the iPhone 7 Plus has been repaired! Picture 1-6  People are undoubtedly pleased upon getting their Apple phone that is the highest-tiered smartphones like the iPhone 6 or iPhone 6, iPhone 7, iPhone 7 Plus, etc. But a few months later, many owners were vexed when devices issues began to emerge. Maybe you went through these process that is iOS 11/10.3.2/10 update, screen replacement, restore from backup, update iOS to previous version, etc. But the iPhone cannot boot again, you don't know the reason and it is the software or hardware problems. Now Vip Fix Shop Team will show you the fix process that is iPhone 6 cannot boot under the retain data situation.  Read More: Quickly Repair Your Mobile Phone cannot Charge Issue Phone fault: The iPhone 6 doesn't boot, the boot current is 700mA. Picture 1-1 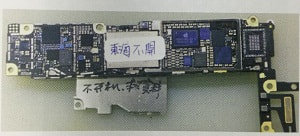 Fix process: 1. Disassemble the iPhone by phone opening tools, take out the iPhone motherboard. Connect it to DC power supply, the boot current shows 700mA, which means there is a power supply short circuit. Picture 1-2 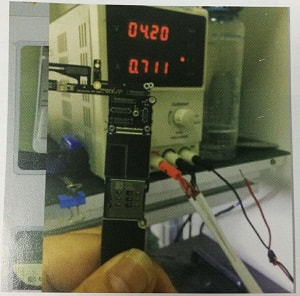 2. Open the phone circuit diagram and check it, we can find that the diode data of PP1V8_SDRAM is low. Picture 1-3  3. Measure the diode data the PP1V8_SDRAM with multimeter, the data only have around 100, it is lower than normal data. Picture 1-4 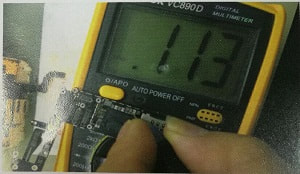 4. According to the repair experience, this group abnormal power supply was caused by damaged capacitor at lower right corner of iPhone CPU. As shown in picture 1-5. We just pick it off. 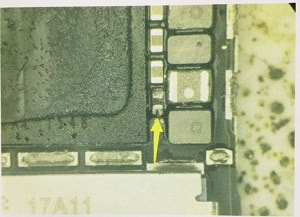 5. After remove it, measure the diode data again, now the data is back to normal. As shown in picture 1-6. 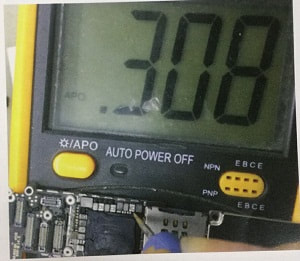 6. Finally, assemble the iPhone and test it, now it can be successfully powered on and smoothly into the IOS system. Picture 1-7. 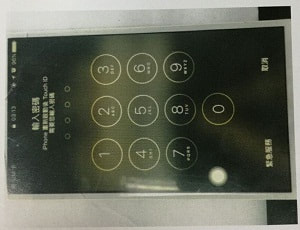 More information about phone repair guides and tools, you can choose Vip Fix Shop Team.
No matter how take care of your phone, maintain its safe and intact, as long as you used it for a long time, there is still change your home button and eventually make it suffer normal wear and tear. If you're still within the one-year warranty and you can contact with Apple. As long as you're covered by warranty, the company will replace your phone or perform any necessary repairs. If your iPhone over warranty and you want to DIY, this article can help you. But if you are not familiar with the phone repair tool, you can sent it to repair store. If you perform the wrong methods and damage your phone, we don't take responsibility.  Read More: iPhone X Issues: Burn-in Screen, Crackling Noise, Paint off etc The Fault: The iPhone 6S home button is unresponsive, when I press it, long time no response. There is one or two times a day will turn into recovery mode. Repaired the CPU and WiFi, 32.768, 24M, NAND were also replaced before, the fault is still existing. The description is shown in picture 1-1. 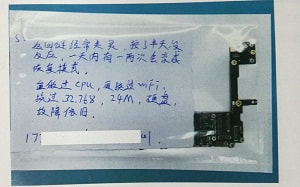 Step 1. Test the iPhone 6s motherboard with multimeter, boot current and power flow is normal, so charge on the side. An hour later, we find that home button has no response by pressing several times. The iPhone device could be lighted by pressing the screen-lock button, but home buttion is responsive after screen is locked, so the fault was judged as wake-up delay. Step 2. Measure BURRON_MENU_KEY_CONN_L, the home button voltage is about 1.3V as normal valure, considering the peer has changed the iPhone WiFi, clock, CPU, so the fault is locked in the fingerprint button scale. The original picture is shown in picture 1-2. 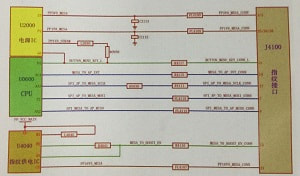 Step 3. According to observe on the picture, we get to know the board is without print, we doubt the iPhone 6S CPU has been doing the real-time test to whole device hardwares after booting, this motherboard has no original fingerprint key. Fingerprint key does not match, so it's suspicious that the CPU has been repeatedly verify if the fingerprint key is matched, which leads to wake-up delay, standby sleep phenomenon. Step 4. Next, we're going to disconnect the fingerprint so that it doesn't work. As shown in picture 1-3. After disconnection, the phenomenon of delayed wake-up disappears. We test again before shipping it back to customer, it cannot be turned on now, measure the current with 70 Ma, connect it to the computer, which displays recovery mode, but does not display the model. As shown in picture 1-4.   Step 5. It cannot identify the model, we find the resistance on phone bitma and measure whether the pull-up voltage is normal, the result is only 1.65V. As shown in picture 1-5. 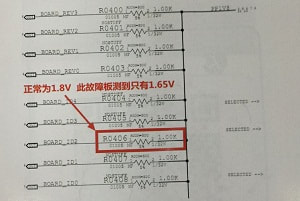 Step 6. Remove a 240 ohm resistor from the scrap motherboard to change the pull up voltage. As shown in picture 1-6. 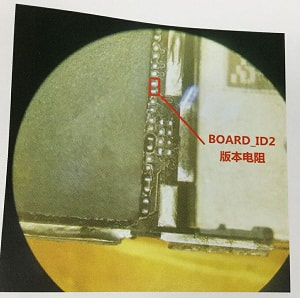 Step 7. After the 240 ohm resistor is switched on, the iPhone 6S main board is perfectly repaired. As shown in picture 1-7.  More information about phone repair guides and tools, you can ask help for Vip Fix Shop Team. When you drop your iPhone in water, Don' t panic. This might seem like a nightmare, but anything is possible. While the new generation of iPhone could be water-resistant, it isn' t entirely waterproof. The most terrible thing is that the iphone camera doesn' t work properly, when you reboot the iPhone after water damaged. You can' t go back in time and save your iPhone from getting dropped in water, but you can make an effort to prevent iPhone water damage. VIPFIX have the fix guide of iPhone 6s rear camera can' t work after water damaged. If your iPhone has the same problem, read on and try to implement these quick solutions.  Read More: The cost only $150 to unlock iPhone X Face ID We got an iPhone 6S from customer, the problem is the rear camera cannot be used after water damaged for a sometime. We replace the new camera, but the problem still the same, so we remove the motherboard and start to repair. Observing it under a microscope, and we found that power supply pipe of rear camera was been burnt down, as shown in picture 1-1, take out it directly. This chip is converted to 2.85V by main power supply chip VCC_MAIN, and then to rear camera, it supply power to front and rear camera on iPhone 6, but it only supply power to rear camera on iPhone 6S. 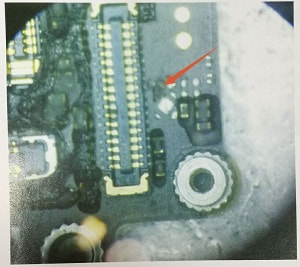 After take out the chip, we found the pin of main power supply was been burnt down. Because this chip is too small and hard to replace, direct short connect is also undesirable and unstable, night photography is not clear, so we want to borrow 3V voltage to here. We heard there is a 3V test point on the motherboard which near the middle plate iPhone screws. But there are four test points, and we're not sure which one. We shave one and then turn it on, measure it with multimeter, we found this one is the 3V test point. As shown in picture 1-2 and 1-3. Solder a jump wire on it, as shown in picture 1-4.  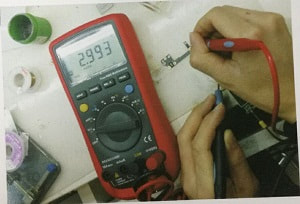  After test, it can take pictures. Apply green UV oil and assemble iPhone. Picture 1-5  What's surprising is that the customer sends the phone back on the next day, and he said all was fine at the beginning, but the phone was in serious heat at night, and then it cannot turn on. Why is that? Measure it with multimeter, it shows large currents directly, the resistance value of iPhone battery interface is normal, which means the main power supply short circuit, most of this is caused by the breakdown of the capacitor. So we' re still going to follow the routine burning process to repair. Apply rosin on the position of main power supply, and then start to burn. Many peers use 2A power multimeter to do it, but direct burning doesn' t work. You can use battery which in mobile power supplies to do it, as shown in picture 1-6.  One side connect machine, one side connect the position which is short circuit, but until the tin wires were melted, there was still no change on the back of the iPhone motherboard. Look at the front of motherboard, we found a little black which in the place of fix the camera problem. Check it more carefully, we found this point was burnt out; the PCB board also was burnt. There was a lot of black dust when we shave with scraper blade, that's why the phone is so hot. Seriously clean the circuit, but the resistance is still low. We need to keep cleaning it up, so we continue cleaning it under the microscope, until the short circuit problem disappears. picture 1-7. 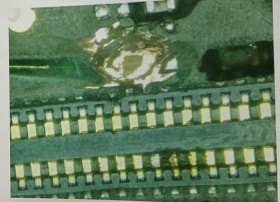 Apply the green UV oil on this point, after baking it with the UV glue ultraviolet light, we install the camera 3V on it. We're worried that the motherboard is still hydrated, so we bake it at 130 degrees on the heating platform. At the end, assemble the iPhone and send back to customer.
Summary: When you are going to fixing cellphone which suffers from water damage, there are likely to be squealed. You have to vaccinate your customer in advance to inform them of the danger. Otherwise, you may face the risk of compensating your customer' s cell phone. If your iPhone screen is cracked and it can' t work, you may think those cracks are causing lack of responsiveness. If it is a simple problem about screen, you just need replace the touch scree. But sometimes, you find your device display manifests as a gray flickering bar and touch screen responsiveness problems. Eventually, the screen loses functionality all together. In fact, you alreadycould have the "touch disease". But if it is a touch disease issue, simply replacing the cracked screen will not fix the problem. Because you might get a new screen that's still unresponsive to your touch.  What is the Symptoms of iPhone Touch Disease? Two primary symptoms: 1. The Phone's screen has a flickering gray bar across the top. 2. The iPhone's multi touch screen is not responding properly. The problem is not with the screen, maybe it is the two touch screen controller chips on the logic board inside the device, someone said. These chips begin to lose contact with the board over time as the phone flexes or twists during normal use, causing the screen to malfunction. The problem has to do the soldering of two touch screen controller chips built into the iPhone.  How to solve iPhone Touch Disease? There are 3 options that you have to solve the problem. I will list them as the Cheapest to the most expensive and provide links. One: Do it by yourself If your iPhone already out of warranty, and you are not afraid to open your phone. To do this you will need an iPhone Repair Kit from Vipfix, Electrical Tape, Hope, and Patience. This may be a favorable option because if it doesn’t work you can still choose the step 2 or 3. You can follow this video to DIY. https://youtu.be/yUUfTzagkpo Two: Replace Touch IC Chips If you won' t fix the issue with the solution above then you may need to take your iPhone to a local maintenance shop. It will have 2 new Touch IC chips soldered and reinforced on your phone. This solution will make sure they reinforce it with metal shield and bonding glue on the chips.  There: Buy a New iPhone
If it is difficult to repair, or excess budget. It is depending on if your iPhone is broken beyond repair. You should make a best decision. More information about cellphone or iPhone repair guides and tools, you can follow vipfixphone.com. If the Super Retina OLED display, portrait mode camera and Face ID are too attracted for you, but you are hesitating for its price. The iPhone 8 and iPhone 8 Plus start selling at $699 and $799, maybe you can save much money instead of $999. So what should you pick? This article is the key to open your shopping door. 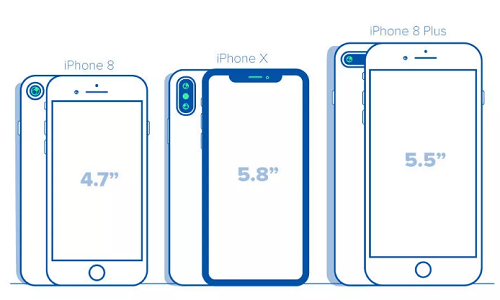 Read More: iPhone 8 VS iPhone X: How to Select One? Design The iPhone X removes the home-button, except for that tiny cutout for its front-facing cameras. Maybe without a home button, you' re going to be swiping a lot more. You need to perform a half-swipe from the bottom edge to get the app-switcher, or perform a full swipe up to get to the home screen. If you' re not looking to learn a new set of gestures just yet, you' ll like the iPhone 7 and 8 a lot more, as their designs retain the home button. The iPhone 8 has a new look that is its glass back. Apple dropped the aluminum backs of the iPhone 7 to give the 8 and 8 plus a glass back, which allows for wireless charging using the Qi standard. Display iPhone X 5.8 inch display is bigger than the iPhone 4.7 inch screens in the iPhone 7 and 8 and the 5.5 inch panels in the iPhone 7 Plus and 8 Plus. Cameras The rear cameras in both the the iPhone X and 8 offer Portrait Lighting, a new technology that maps your face for more-well-lit photos. Also, iPhone X users will snap slightly clearer photos when using the 2x optical zoom, including those taken in low-lighting situations. That' s thanks to its rear telephoto lens, which features a f/2.4 aperture that takes in more light. The iPhone X and 8 Plus also feature dual rear-facing 12-megapixel sensors that can record up to 4K video at 60 frames per second. The iPhone X' s 7MP selfie cam shoots 1080p video at up to 60fps, while the front-facing lens on the 8 Plus shoots 1080p video at up to 30fps. Both the iPhone 8 and X cameras are built for Augmented Reality technology, with customization for low light recording and 60 fps smoothness. Also, the phones feature new gyro and accelerators. Face ID The iPhone X introduces Face ID, which uses 3D facial recognition for unlocking the iPhone and payments. Face ID replaces Touch ID by scaning the face. You don' t get more speed for your buck in the iPhone X vs the iPhone 8, as both feature Apple' s A11 Bionic CPU. This is the next generation of the A10 Fusion processor found in the 7 and 7 Plus. The A11 Bionic chip provides a major boost, with 20 percent improvement on dual-core processes, and a 70 percent jump on quad-core activity. The new A11 chip also has a new custom-designed GPU. 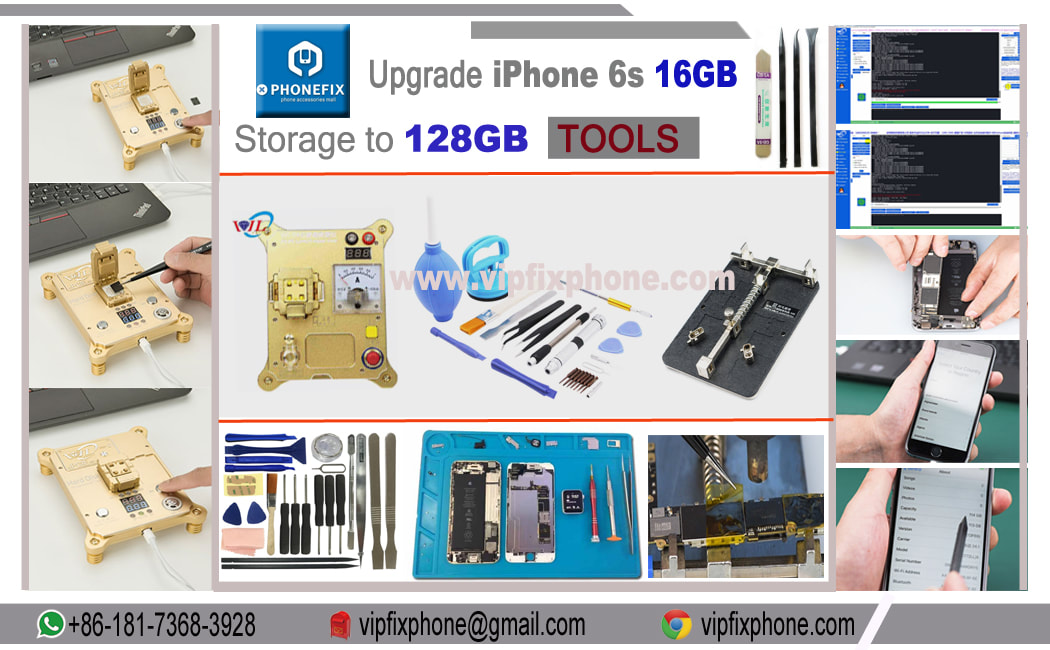 Battery Life
Apple claims that the iPhone X will last around 2 hours longer than the iPhone 7. If so, it will be a very long-lasting phone. The iPhone 8 and X are the first two Apple smartphones to feature wireless charging, made possible by changing to a glass back for Qi-based charging. Animoji Apple custom-animated emoji, dubbed Animoji, is an iPhone X exclusive, as only that phone includes the front-facing sensors that can capture each user' s facial expressions. Pricing and Storage iPhone X starting price is $999 64GB model, the 256GB costs $1,149. The iPhone 8 Plus starts at $200 64GB model, the 256GB costs $799. You'll spend $100 less than that for the smaller iPhone 8, which costs $699 for 64GB and $849 for 256GB. More information about phone repair tools and guides, you can ask help for Vip Fix Shop Team. When selecting tools to repair mobile phones, it is important to select the best tools. Cheap or inexpensive tools may not be handy when repairing a mobile phone. And the best quality little expensive tools will help you to repair a mobile phone easily and comfortable. VIPFIX come up with a list of the most popular tools used in successful DIY smartphone & tablet repair projects, hoping you can benefit from it.  There are lots of phone repair tools in the market. So it is very common for repair technician to use various screwdrivers when disassemble smartphones. Choose best brand tools and high quality screwdrivers are very essential to remove screws on iPhone housing, LCD display and PCB.
Tips: You can use the magnetic screwdriver as possible as, because you can collect screws easily as you remove them. iPhone Opening Tools: This Complete Repair Tool Kit provides you with all of the high quality recommended tools needed to repair the iPhone 8 and 8 Plus. The iPhone opening tools are premium, strong and durable. VIPFIX offers a free plastic opening tool and any replacement part. But to complete the repair, more tools may be required. Ordering this custom iPhone 8 and 8 Plus tool kit, you will receive a small Phillips screwdriver, flathead screwdriver, opening pry tools, phone disassemble tools, a suction cup, metal pry spudger, tri-point screwdriver, precision pointed tweezers, BGA paver scraper, metal graver- everything can ensure you complete an iPhone 8 and 8 Plus repair successfully. iPhone PCB Holder Fixture: The PCB holder fixture is mainly used to fix iphone circuit board on the maintenance fixture, It can make circuit board not slide back and forth in the course of maintenance. Vip Fix Shop Team has these types of tools. It has lots of advantages: such as portable, precise and hot temperature resistant and more convenient to operate. It's an essential choice for every iphone or cell phone maintainer. |
vipfixphone
|
 RSS Feed
